Capcut 4K Video Setting Enhance Your Video Quality
In the digital age, creating high-quality videos has become more accessible than ever. With the right tools and techniques, you can produce stunning 4K videos that captivate your audience. In this article, we’ll explore the world of Capcut, a popular video editing application, and delve into its 4K video settings to help you enhance your video quality.
Introduction to Capcut
Before we dive into the specifics of 4K video settings, let’s get acquainted with Capcut. Capcut is a versatile and user-friendly video editing app designed for both beginners and experienced video creators. It offers a wide range of features, including trimming, cutting, adding transitions, effects, and more. With its intuitive interface, Capcut makes video editing a breeze.
The Importance of 4K Video
4K video resolution, also known as Ultra High Definition (UHD), offers four times the number of pixels as Full HD (1080p), resulting in incredibly sharp and detailed videos. Whether you’re creating content for YouTube, social media, or professional projects, 4K video provides a visually stunning experience for your viewers.
Configuring Capcut for 4K Video
1. Setting up Your Project
When you start a new project in Capcut, it’s essential to configure it for 4K video. Here’s how:
- Open Capcut and create a new project.
- Select the 4K resolution (3840×2160 pixels) as your project’s resolution.
- Choose the frame rate that suits your project, typically 24, 30, or 60 frames per second (fps).
2. Importing 4K Footage
To create a 4K video, you’ll need to import 4K footage into your project:
- Click on the “Import” button and select your 4K video clips.
- Capcut will automatically match the project settings to your imported footage.
3. Editing in 4K
Now that your project is set up for 4K video, you can begin editing:
- Trim and arrange your clips as needed.
- Add transitions, effects, and text to enhance your video.
- Ensure your audio is of high quality to complement the visuals.
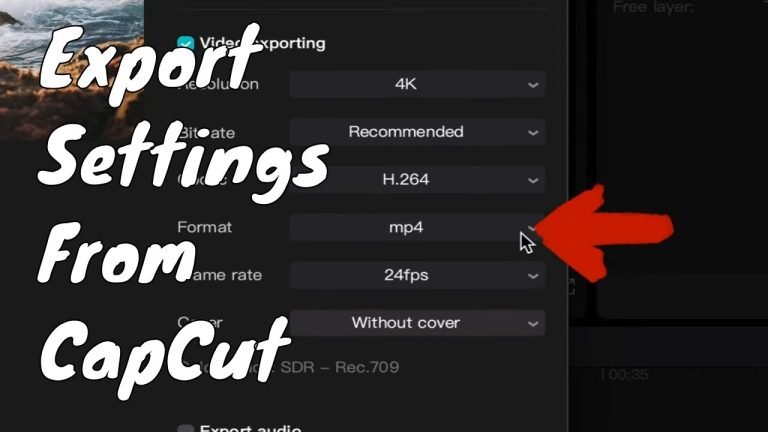
4. Exporting in 4K
Once your editing is complete, it’s time to export your masterpiece in 4K:
- Click on the “Export” button.
- Select the 4K resolution and your preferred file format (MP4, MOV, etc.).
- Choose the desired bitrate for optimal quality.
Benefits of 4K Video
4K video offers numerous benefits for content creators:
- Crisp Detail: 4K videos display every detail, making your content visually appealing.
- Flexibility: You can crop, zoom, or stabilize footage without sacrificing quality.
- Future-Proof: As 4K becomes the standard, your content will remain relevant.
- Professionalism: High-quality videos enhance your brand’s reputation.
Conclusion
In conclusion, mastering Capcut’s 4K video settings is the key to creating stunning videos that leave a lasting impression. By configuring your project correctly, editing with precision, and exporting in 4K, you’ll elevate your video content to the next level.
Don’t miss out on the opportunity to create captivating 4K videos. Get started with Capcut today and unleash your creativity.
Frequently Asked Questions (FAQs)
1. What is Capcut? Capcut is a user-friendly video editing application that allows you to edit and enhance your videos with ease.
2. Why should I use 4K video resolution? 4K video offers superior image quality, providing more detail and sharpness compared to lower resolutions.
3. Can I edit 4K videos on a regular computer? Yes, you can edit 4K videos on most modern computers, but it may require more processing power.
4. What frame rate should I choose for my 4K project? The frame rate depends on your project’s style. 24fps is cinematic, while 60fps is smoother for action shots.
5. Where can I download Capcut? You can download Capcut from your device’s app store or the official website.